How to use "Presenter Tool" and display "Notes"
"Presenter tool" displayed on the PC screen
If you challenge the presentation without knowing this mechanism, when you run the "slide show", a "unusual screen" will be displayed, and you will end up making the announcement while being puzzled.To prevent this from happening, it is necessary to check how to use the "Presenter Tool" in advance.
However, some people may feel that it is troublesome to connect to a projector or a large TV just to check the operation.Therefore, let's introduce how to check the operation of the "Presenter Tool" with a personal computer alone.
When checking the operation of the "Presenter Tool" with a personal computer alone, start PowerPoint and press the "Alt" + "F5" key.
Then, the screen display of the personal computer switches as shown in the figure below, and the "Presenter Tool" is displayed on the entire screen.
In the case of the "Presenter Tool", it is basically to proceed with the slide display by clicking the mouse.Click the "Slide displayed in the upper left" in the example shown in the figure above to proceed to the second slide display.
In addition, it is also possible to switch the display to the slide before and after using the "triangular arrow" icon at the bottom of the screen.
Just in case, let's introduce the screen configuration of the "Presenter Tool".In the upper left of the screen, "current slides", that is, "slides projected on the external monitor" are displayed.On the other hand, the next slide is displayed at the top right of the screen.In the lower right, the current slide notebook is displayed.
In summary, it looks as follows
■ "Current slide" displayed on the upper left slide external monitor
■ "Next slide" displayed on the external monitor after clicking on the upper right
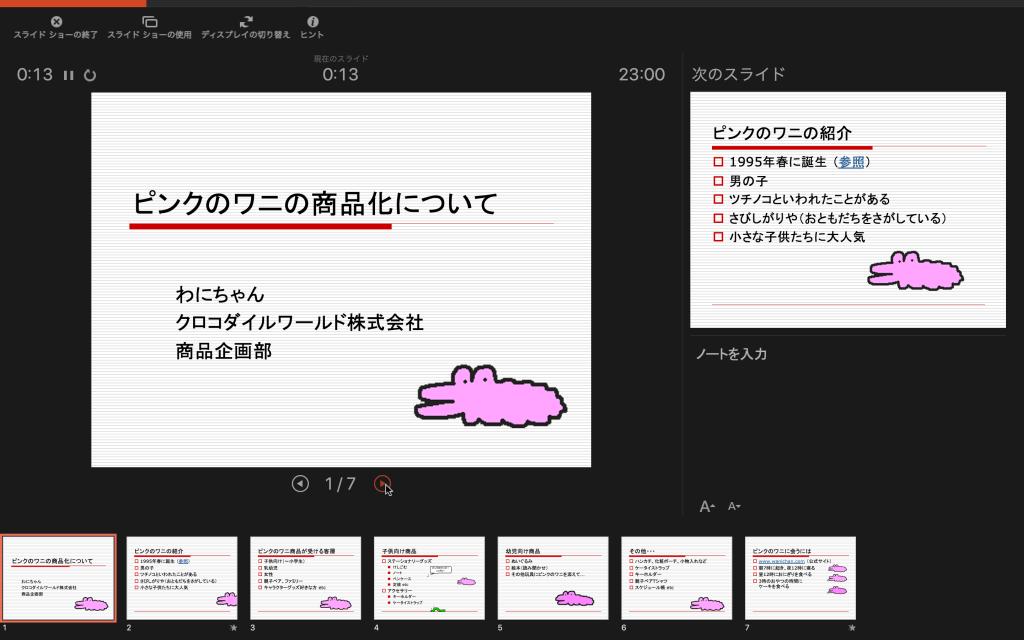
■ Text at the bottom right Currently, "Notes" of the slide displayed
Display adjustment of notebook (presentation manuscript)
The "Presenter Tool" also has a "notebook" of each slide.For this reason, it is possible to read the manuscript for presentation while looking at the computer screen, even if you do not print a "note" in advance.* For "Note", see the previous (23rd) series.
However, there are cases where the letters are small and difficult to read.The laptops used at the time of announcement have a small screen, and you have to look at the computer screen from a position away from normal work, so it is highly likely that characters will not be read.
In such a case, click the two icons at the bottom left of the "Lap area" to change the character size.
This makes it a little easier to read, but this time the number of characters displayed on the screen is reduced.So, remember how to change the size of the "notebook area".
This operation is very simple, just drag the ruled line on the left and top of the "notebook area".This makes it possible to change the screen configuration of the "Presenter Tool" as shown below.
Although the display of the slide becomes smaller, the "note" can be displayed easily.It would be useful to remember it as a countermeasure when you want to focus on "note" at the time of announcement.
In this way, it is possible to customize the screen of the "Presenter Tool" to some extent.However, it is still more convenient to print a "note" as a paper document.* For the printing method of "Notes", see the previous (23rd) series.
In other cases, it is possible that the presentation venue is dark and cannot read the printed "note".In such a case, there is a method of putting the presentation on the tablet together and holding the tablet with one hand.
The "tablet app" used at this time may be your favorite one.You can create a presentation manuscript using the document creation app, or if there is no appropriate app, create a presentation manuscript on your computer, convert it to a PDF and transfer it to a tablet.Basically, if the apps that can be displayed in an easy -to -view text, it will play a role as a manuscript for presentation.
The usage around here also depends on the "each preference", so it is a good idea to try various ways that you think is easy to use.PowerPoint has a function called "notebook", but it does not necessarily have to be used.
Various functions that are running slide show
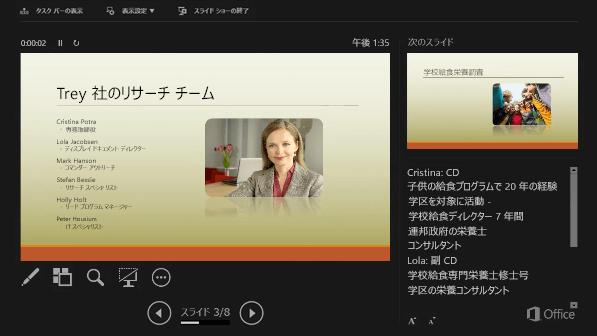
Finally, let's introduce the functions that can be used during the slide show.The "Presenter Tools" also includes icons as shown in the figure below.
The use of these icons is basically the same as when the "slide show" is usually executed.For example, if you want to use a "laser pointer", you can operate it as shown in the figure below.
This is introduced in the 21st series in this series, so it is a good idea to refer to it.Of course, various operations can be performed using a shortcut key.


![10th generation Core i5 equipped 9.5h drive mobile notebook is on sale at 50,000 yen level [Cool by Evo Book] 10th generation Core i5 equipped 9.5h drive mobile notebook is on sale at 50,000 yen level [Cool by Evo Book]](https://website-google-hk.oss-cn-hongkong.aliyuncs.com/drawing/article_results_9/2022/3/9/4a18d0792cae58836b71b9f591325261_0.jpeg)

![[Amazon time sale in progress! ] 64GB microSD card of 1,266 yen and wireless earphone with noise canceling function of 52% off, etc. [Amazon time sale in progress! ] 64GB microSD card of 1,266 yen and wireless earphone with noise canceling function of 52% off, etc.](https://website-google-hk.oss-cn-hongkong.aliyuncs.com/drawing/article_results_9/2022/3/9/c88341f90bab7fe3ce1dc78d8bd6b02d_0.jpeg)
